XPS foam board is easy to underestimate. On a busy job, small cutting mistakes turn into bigger problems: boards that do not sit flat, seams that need extra foam, dust that ruins tape adhesion, and time lost re-cutting pieces. The difference usually comes down to a few repeatable habits—choosing the right tool for the thickness, keeping the board supported, using a guide, and cutting in a controlled way instead of forcing it. This article walks through the three cutting methods used most often (utility knife, hot wire, and saw), when each one makes the most sense, and what to watch for if you want straight edges and tight joints. The aim is practical: fewer gaps, less waste, and faster installation with consistent results.
What clean and fast cutting really means on site
Clean and fast cutting is mainly about getting boards to fit the first time. A clean cut gives you a straight edge that meets the next board with little to no daylight showing through the seam. A fast cut is the one that does not create extra steps afterward, like shaving off high spots, vacuuming foam dust from the floor, or filling oversized gaps with cans of foam. When seams are sloppy, the insulation layer can end up with more air leakage paths and inconsistent contact with the substrate, which is exactly where performance gets lost in real buildings. In practice, the best cutting routine is the one that keeps the workflow moving: measure once carefully, cut accurately, dry fit quickly, then install without fighting the piece.
Pick the right tool for the job and you will save the most time
Tool choice is where most time is either saved or wasted. For typical jobsite work, a utility knife with fresh blades is the most reliable way to get clean edges with minimal mess, especially when you are trimming to fit between studs, joists, or around window returns. Hot wire cutters are often the quickest way to keep edges smooth and seams tight when you have repeat cuts all day, such as strip cuts for sheathing layers or consistent panel sizing for a crew. Saws can be the fastest on large volumes, but they only stay “fast” if you control dust and keep the board stable; otherwise you trade cutting time for cleanup and rework. A simple way to decide is to look at thickness, quantity, and environment: thicker boards and high volume favor hot wire or saw setups, while indoor work and detail cuts favor the knife method because it keeps dust and noise down.
Method that works almost everywhere the utility knife workflow
The knife method works because it cuts the foam cells instead of tearing them. Start by measuring the opening and writing the number down, then mark the cut line clearly; on thicker boards, mark both faces so you can keep the cut square. Put a metal straightedge on the line and lock it in place, because most crooked cuts happen when the guide shifts halfway through. Make several light passes, letting the blade do the work; pushing hard is what makes the edge crumble and creates a wavy line. For thicker panels, flip the board and repeat on the back so the two cuts meet in the middle, then finish with a final pass to separate cleanly. Keep a pack of spare blades right next to the work area and change them early, because a slightly dull blade is the difference between a clean edge and ten minutes of patching and sanding.
Cleanest edge for tight seams the hot wire method
Hot wire cutting is popular when the goal is the smoothest possible edge with consistent results. Set up a straight fence so the board runs true, and add a stop block if you are making the same length repeatedly; that small setup step saves a lot of measuring time. Let the wire stabilize at temperature, then feed the board at a steady pace without pausing, because pausing can leave burn marks and a slightly recessed edge that shows up later at the seam. The cut quality is usually good enough that pieces fit together with less taping and less foam filling, which speeds up installation and improves the finished look of the insulation layer. Keep the workspace ventilated and follow the cutter manufacturer guidance, especially in enclosed rooms, because even though crumbs are reduced, you still want clean air practices. On busy days, it helps to keep the fence clean and free of foam buildup, since a thin layer of residue can change the cut line just enough to create a gap across multiple boards.
Fastest for big volume the saw method without ruining the edge
Saws earn their place when you have lots of straight cuts and you need throughput. The key is support and consistency: support the board on both sides of the cut so it does not vibrate or sag, because vibration is what makes edges ragged. Do a test cut first and inspect the edge; if the foam looks torn, the setup is too aggressive, and if it looks melted or glossy, the cut is heating up and the feed rate or blade choice needs adjustment. Dust control matters more than most crews expect, because foam dust settles on tape, adhesives, and tools, and then everything slows down—pieces slip, tape does not stick as well, and cleanup time grows. A vacuum or dust extractor connected to the saw turns saw cutting from “fast but messy” into “fast and manageable.” A practical habit is to cut the first few panels as reference pieces and keep checking against them, so you catch small errors in guide alignment or technique before you have a full stack of off-size boards.
Product value and who benefits most from working with a real XPS manufacturer
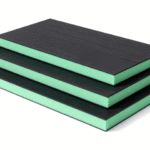
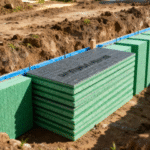
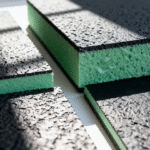
XPS foam board insulation is valued for a combination of thermal performance, compressive strength, and moisture resistance, which is why it shows up in walls, roofs, floors, under slab applications, and cold storage builds. Those benefits only translate into real project value when the boards are consistent: stable thickness, reliable density, accurate dimensions, and packaging that keeps corners intact during shipping and handling. The customers who typically benefit most from direct manufacturer cooperation are wholesalers and distributors who need steady supply and consistent specs, importers who rely on export-ready packing and documentation, trading companies that want flexible mixed orders, and contractors or project procurement teams who care about predictable lead time and panels that fit without constant trimming. A manufacturer-level partner is also helpful when buyers want custom sizes to reduce onsite cutting waste, edge profiles that support tighter joints, private label packaging, and technical documents aligned with common evaluation frameworks used in many markets, including ASTM and ISO test methods. Duolongtrade operates as a real and professional XPS manufacturer, and the practical value for customers is fewer claims, less breakage in transit, more consistent installation results, and a supply plan that can scale from trial orders to repeat container shipments with stable quality.
From a purchasing viewpoint, “easy to cut and install” comes down to product consistency and supply reliability. This article explains the three practical cutting routes—knife, hot wire, and saw—and how each affects edge quality, dust, and installation speed. The bigger takeaway is what to look for from a supplier if you want predictable jobsite results: consistent thickness across boards, stable density and strength, accurate dimensions, and packaging that protects edges and corners during transport. Those factors reduce the need for trimming, make tight seams easier, and cut down on foam filling, taping issues, and rework. When evaluating suppliers, confirm dimensional tolerances, available custom sizes to reduce onsite cutting, edge profile options, and a clear specification set (thickness range, density or compressive strength, application guidance). On the commercial side, lead time stability, batch-to-batch consistency, and export-ready documentation matter just as much as price. The payoff is lower total installed cost, fewer claims, and smoother repeat ordering.